

|
|
|
|
|
Contents |
Use this process to import pay record information to update existing pay records in WESPaC. You may import records from a variety of programs, including such programs as Microsoft Access and Excel.
First, save the file.
Next, use the following steps to import the file and define each field:
Access the process from the following location:


Click HUMAN RESOURCES.
Click PAYROLL.
Click UTILITIES.
Select Pay Record Import File Definition. Either double-click your selection, or follow it by clicking RUN. The Pay Record Update via Import File Definition screen opens.
Click +ADD to open the File Definition Maintenance screen.
Enter a File Code of up to five characters for the file you will import.
Enter a Description for the file.
Click FILE NAME and browse to find the file. The path and file name length is limited to 50 characters.
When your file name, including the full path location is longer than 50 characters, you see the Invalid File message “The file name is not valid. Please select a valid file before proceeding.” If you get this message, you may need to shorten the file name or move the import file to a location with a shorter path.
The import file should not have a heading row.
Select a File Type:
Variable (Delimited): Select this if there is a separating character after each field in your import file, which allows the width to vary for each field.
Select one of seven different Delimiter types, making a choice based on the source of your data file. Commas, for example, work well with the comma-separated values (CSV) format for files created in Excel.

Click OK to save your File Choice.
Select fields to define from the Fields display:

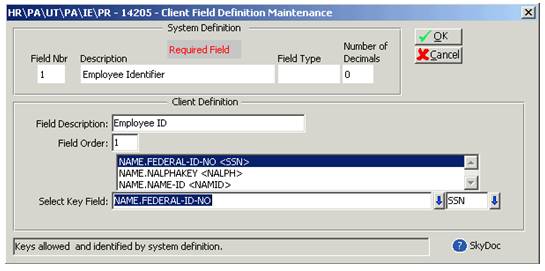
Highlight, one at a time, the row for each field you want to include. Either double-click the row or click UPDATE FIELD DETAIL to make changes in the Client Field Definition Maintenance screen. (Click DELETE FIELD DETAIL to remove a field. Required fields may not be deleted.)
Important: You must include fields with Yes in the Required Field column.
Defining field details using the Client Field Definition Maintenance screen:
Enter a Field Description.
Enter a Field Order for the order in which the field appears in the import file.
Select Key Field: Select a database field from the menu that corresponds with the type of data that exists in your import file for the particular field. This menu selection is only included on fields that are of type Key.
If selecting a field for Employee ID, for example, one of the choices is using the Social Security Number, which corresponds to the NAME.FEDERAL-ID-NO field.
For fields requiring dates, select a date format from the Date Format field.

Click OK when you are satisfied with your field definition or CANCEL to exit.
Repeat this process for each desired field. The rest of the fields will be omitted as long as the Field Order column has a question mark "?".
Fixed Width: Select this if there are a specific number of characters for each field in your import file.
Click OK to save your File Choice.
Select fields to define from the Fields display:
Highlight, one at a time, the row for each field you want to include. Either double-click the row or click UPDATE FIELD DETAIL to make changes in the Client Field Definition Maintenance screen. (Click DELETE FIELD DETAIL to remove a field. Required fields may not be deleted.)
Important: You must include fields with Yes in the Required Field column.
Defining field details using the Client Field Definition Maintenance screen:
Enter a Field Description.
Select a Field Start Position.
Field Length: Enter the number of characters for the field.
Select Key Field: Select a database field from the menu that corresponds with the type of data that exists in your import file for the particular field. This menu selection is only included on fields that are of type Key.
If selecting a field for Employee ID, for example, one of the choices is using the Social Security Number, which corresponds to the NAME.FEDERAL-ID-NO field.
For fields requiring dates, select a date format from the Date Format field.
Click OK when you are satisfied with your field definition or CANCEL to exit.
Repeat this process for each desired field. The rest of the fields will be omitted as long as the Field Order column has a question mark "?".
Click REPORT to create a validation report, allowing you to check the report's field arrangement.
Select an Output and Printer from the listed options.
Click OK to create the report.
Examine the report to see if the arrangement is satisfactory. Look for error messages at the bottom of the report. If errors exist, go back and make additional definition changes to those fields. You may run the report a second time to check whether errors have been corrected.
Click CLOSE to exit this process when the arrangement is satisfactory and no errors exist.
Page Updated 7/2010